Tech Tips
Product Compatibility with #100364 Slow BPO Cream Hardener
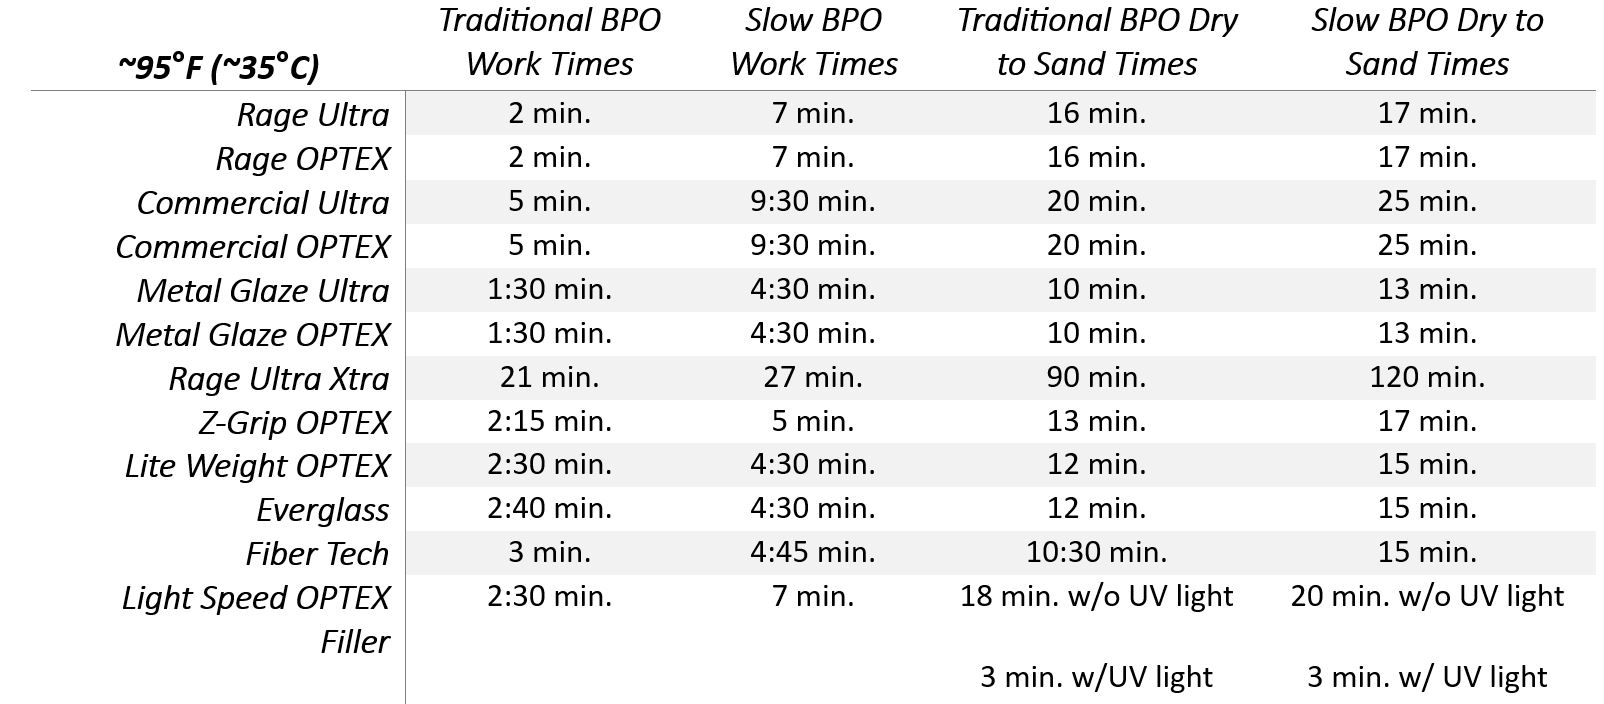
If additional working is required due to high temperatures, or for larger repairs with the below listed products, it is recommended to use EVERCOAT Slow BPO Cream Hardener part #100364.
Compatible EVERCOAT Fillers and Putties:
• Light Speed™ Optex® Premium Filler
• Rage® Optex™
• Rage® Ultra
• Commercial Ultra™
• Commercial Optex®
• Rage® Ultra Xtra
• Metal Glaze Optex
• Metal Glaze Ultra™
• Z-Grip® Optex®
• Lite Weight® Optex®
• Everglass®
• Fiber Tech®
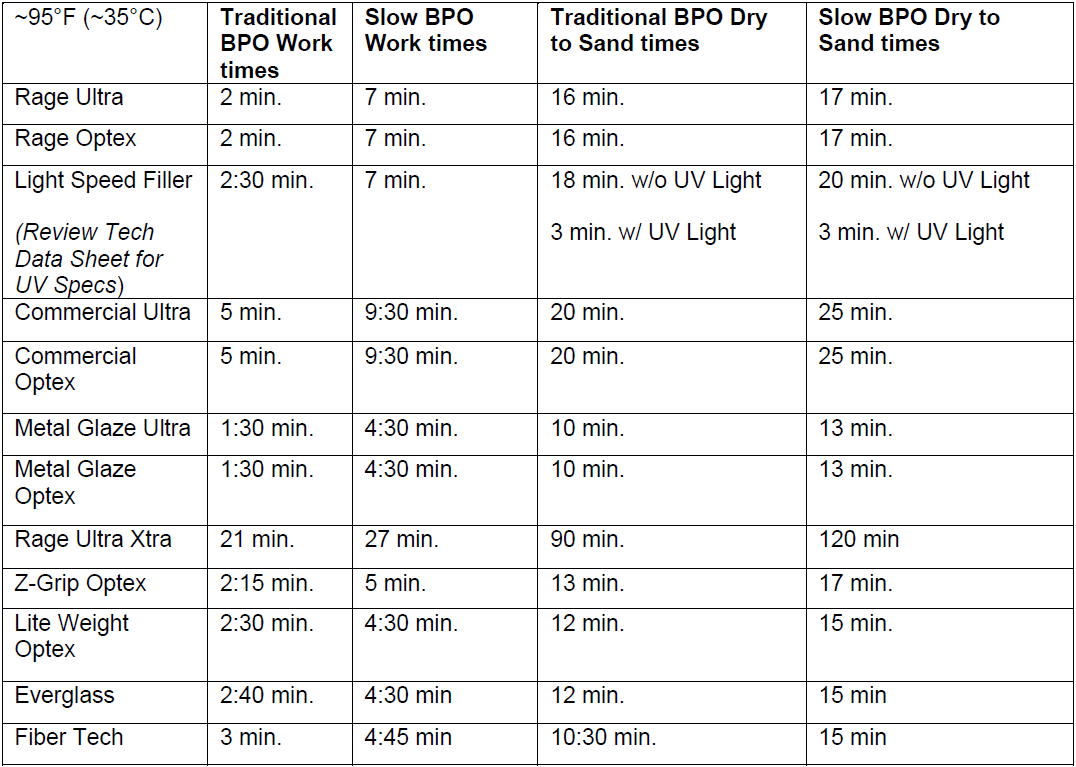
NOTE: Physical testing performed @ ~95°F (35°C) / 40% RH as noted.
CAUTION: EVERCOAT Slow BPO Cream Hardener part number 100364 is not compatible with #864 / #865 SMC Resin or products not listed above, and therefore not to be used with unlisted products or competitive products. Those products contain non-compatible resins and require different catalyst chemistries. Do not under-catalyze products when using Slow Cream Hardener #364.
| DOWNLOAD PDF VERSION |
How to Read Batch Codes
SUBJECT: Batch Code Revision Effective 8/1/23
As of August 1st, 2023 Evercoat products (filler, putties, polyester primers, resins, and gel coats) will begin using a seven-digit batch code numbering system to better identify the year of production with two digits in lieu of the previous six-digit batch code with only one digit to identify the year of production.
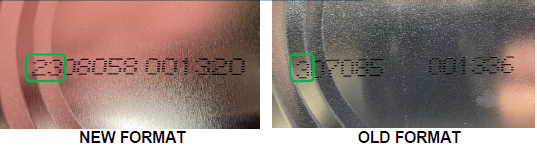
NEW FORMAT (7 digits)
23 08 058 001320
↑ ↑ ↑ ↑
Year Month Batch # in month 1,320 can filled in production Sequence
(2023) (August)
01=January
02=February
03=March
04=April
05=May
06=June
07=July
08=August
09=September
10=October
11=November
12=December
OLD FORMAT (6 digits)
3 07 085 001336
↑ ↑ ↑ ↑
Year Month Batch # in month 1,336 can filled in production Sequence
(2023) (August)
01=January
02=February
03=March
04=April
05=May
06=June
07=July
08=August
09=September
10=October
11=November
12=December
This new format will also include a six-digit sequence identifier to show when the product was filled in the batch production. This will help to identify where the product was filled during the packaging sequence from start to finish.
NOTE: Specialty products such as Kitty Hair, Tiger Hair, Gel Coats, Resins, and Primers will have a stickered batch code until further notice.
| DOWNLOAD PDF VERSION |
BPO Batch Code Revision Update / Batch Code Placement
SUBJECT: BPO Batch Code Revision Update / Batch Code Placement
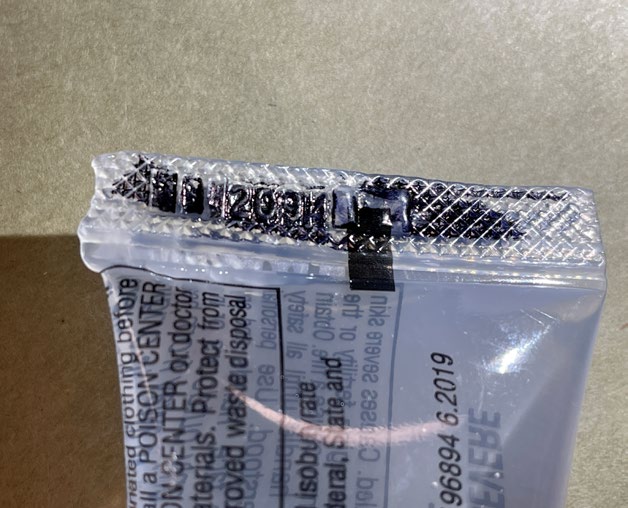
As of June 2023, Evercoat Cream Hardeners will transition to using an updated eight-digit batch code numbering system. The new system will use two digits to identify the year (23 for 2023) followed by two digits for the month (06 for June) with the remaining digits identifying the specific batch information.
The examples below show the area where the batch date is located with a black mark at the crimp area. Hint: To help read the numbers use a pencil or a marker to highlight the numbers
NEW FORMAT: The first two digits identify the year with the third and fourth for the month.
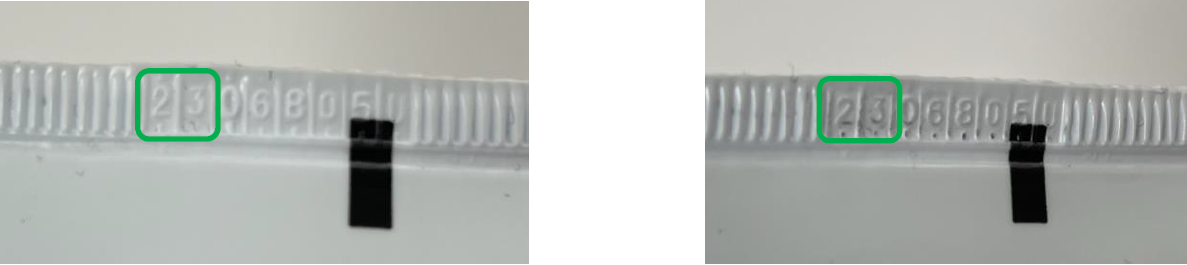
Hint: To help read the numbers use a pencil or a marker to highlight the numbers
2306805U
23 06 805U
↑ ↑ ↑
Year(2023) Month(June) Batch Information
- 01=January
- 02=February
- 03=March
- 04=April
- 05=May
- 06=June
- 07=July
- 08=August
- 09=September
- 10=October
- 11=November
- 12=December
Branded Evercoat BPO Cream Hardener will have the GHS Caution Symbols shown below with three orange diamonds.
EVERCOAT Tube Format
The tubes will show the address for Rocket Plastics Co. and ITW Permatex Canada.
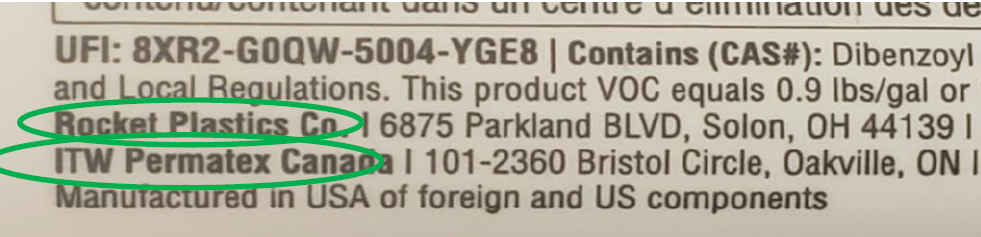
EVERCOAT BPO Cream Hardener Tubes list ITW Permatex for distribution in Canada as per GHS Regulatory Requirements
OLD FORMAT: Previous Batch Dating format from 2/1/97 until June 2023 had last digit of .
The example below shows a batch date of 606803UI.
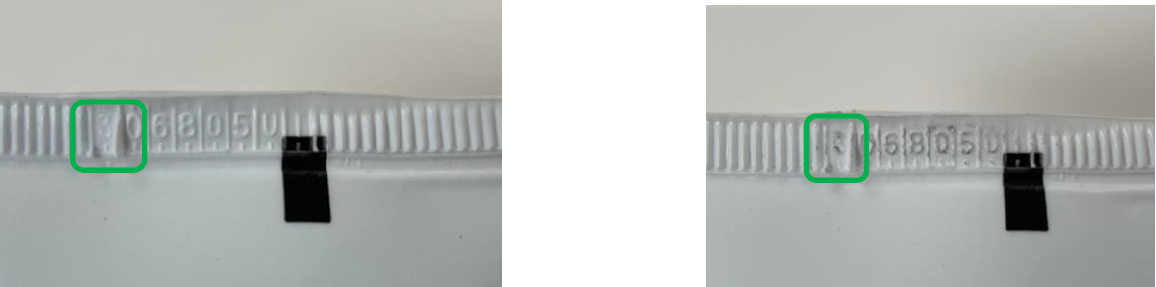
306805UI
3 06 805UI
↑ ↑ ↑
Year(2023) Month(June) Batch Information
- 01=January
- 02=February
- 03=March
- 04=April
- 05=May
- 06=June
- 07=July
- 08=August
- 09=September
- 10=October
- 11=November
- 12=December
| DOWNLOAD PDF VERSION |
Body Filler High Heat and Large Panel Application Recommendation
It is common to cut back on the cream hardener/catalyst when working in hot temperatures to extend working time, however excessive under-catalyzation can lead to post-paint repair mapping/movement, or even cracking under extreme conditions.
This can occur when the filler is radically under-catalyzed and painted to a dark color. When the repair is exposed to the sun the panel heats up thus reactivating the uncured materials and causing the filler to post-cure and move. If the filler is excessively under-catalyzed the solvents in the filler that should have hardened in the curing process may even begin to gas off and dry out leading to the filler cracking. To avoid these issues Evercoat recommends catalyzing fillers at a ratio of 50:1 (2%) and use below 90°F/32°C to provide ample working time.
It is not recommended to catalyze Evercoat fillers below the minimum ratio of 1%. Ambient heat will not offset the incorrect catalyst ratio to create a proper cure. To help achieve more working time it is recommended to store the filler and cream hardener/catalyst in a cool dry area before use to help slow down the reaction and provide the needed working time. Cooling the panel before the application of the repair material can also help to extend the working time. Mixing smaller amounts while spreading the mixed product out over a larger working surface can also help to dissipate the heat and slightly extend the working time.
NOTE: Where available incorporate Evercoat Rage® Ultra XTRA™ #100144 or #100147 to extend the working time for high heat and large panel applications when needed. Refer to the
Technical Data Sheet for mixing guidance when mixing with the following Evercoat Products:
- Rage® OPTEX®
- Rage® Ultra
- Rage® Gold
- Rage®
- Z-GRIP® OPTEX®
- Z-GRIP®
- LITE-WEIGHT® OPTEX®
- LITE-WEIGHT®
- Commercial Optex®
- Commercial Ultra™
- EverGold Filler
- CHROME-A-LITE™
May also be added to Evercoat Premium Polyester Glazing and Blending Putties to extend working time and adjust viscosity for high-heat applications.
WARNING: Rage® Ultra Xtra is NOT to be used with Quantum1™ 10:1 Single Step Repair Technology products.
| DOWNLOAD PDF VERSION |
Evercoat Approved UV-A LED Curing Lights
The following UV-A LED Curing Lights have been tested and approved for use with the EVERCOAT Light Speed System.
Scangrip UV-GUN 03.5803US
Hedson IRT UV SMARTCURE System
Spectratek InstaCure UVLED
For more information on the approved UV-A LED Lights check this Tech Tip for future updates.
| DOWNLOAD PDF VERSION |
Application of Fiber Reinforced Fillers over Welds
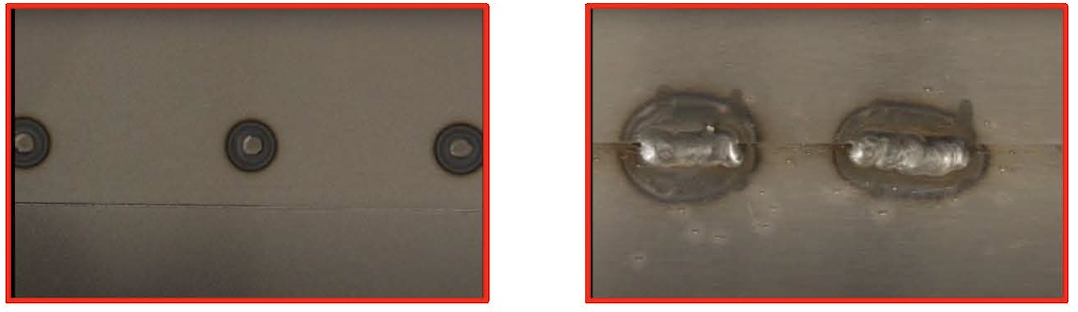
The application of an Evercoat Fiber Reinforced Filler should be over a solid welded seam. To avoid excessive heat and warping, use an overlapping stitch weld (skip welding) process to connect the welds and eliminate the possibility of movement and moisture penetration from the back side of the weld.
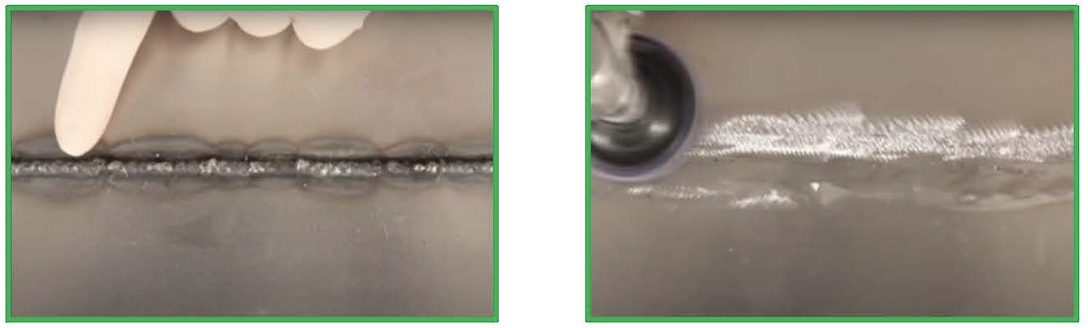
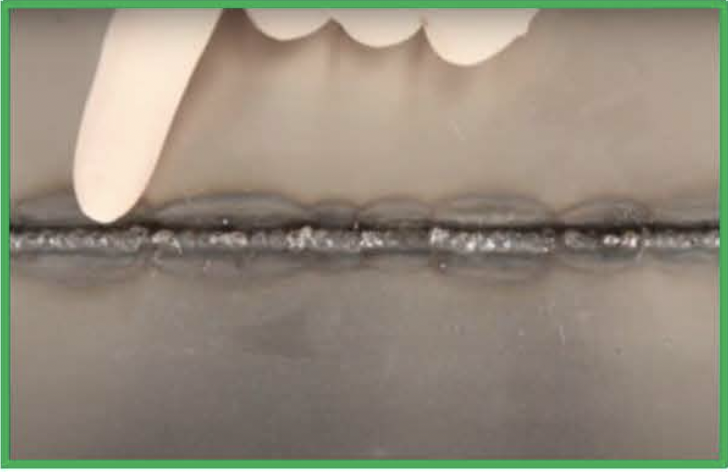
Examples of improper welds:
These welds allow the potential of a panel seam movement and moisture migration between the panels to cause panel seam mapping, corrosion, and adhesion failure.
NOTE: When using fiber reinforced fillers, it is advised to apply those materials directly to the substrate and avoid the use of an epoxy pre-coating.
| DOWNLOAD PDF VERSION |
MEKP Batch Code / Batch Code Placement
Evercoat Liquid Hardener (MEKP) has a Batch Code Dating system located at the bottom of the tube in the crimp. This applies to both the 11 cc tube (#196294) and the 22 cc tube (#196894).
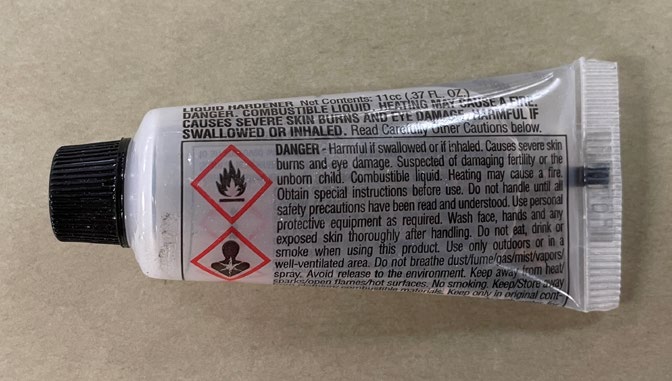
11 cc (.37 FL OZ.)
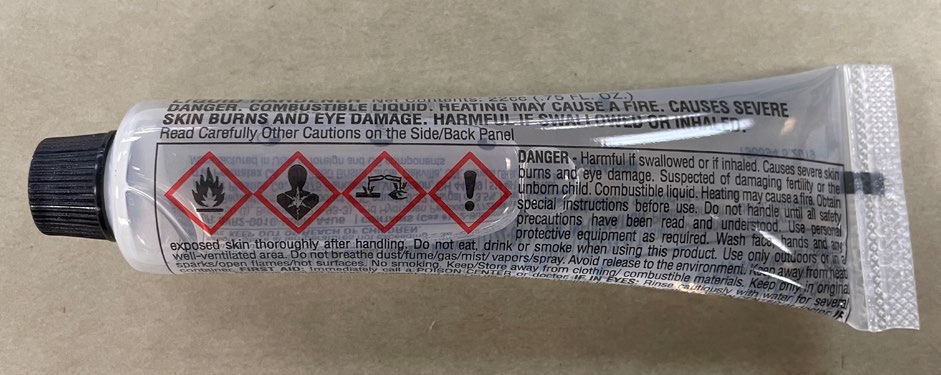
22 cc (.75 FL OZ.)
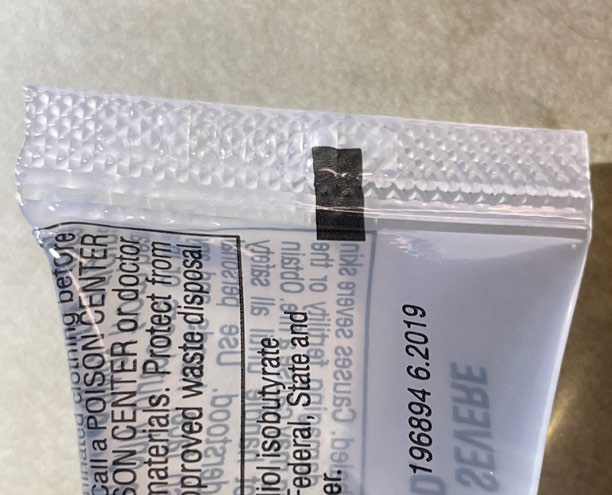
The example below shows the area where the batch date is located with a black mark at the crimp area.
There are two batch dating versions used for Evercoat Liquid Hardener (MEKP). One is a 4-digit batch code and the second is a 6-digit batch code.
4-Digit Batch Code Example:
This example below shows a 4-digit batch date of 2094 using a Julian Date Calendar system. This tube was packaged on April 4th of 2022.
Hint: To help read the numbers use a marker and/or an LED light to help highlight the numbers
2 094
Year Packaging Day
(2022) 94th day of the year= April 4th
6-Digit Batch Code Example:
The example below uses a batch date system like Evercoat BPO Cream Hardener and
Filler products with a 6-digit batch date of 107071.
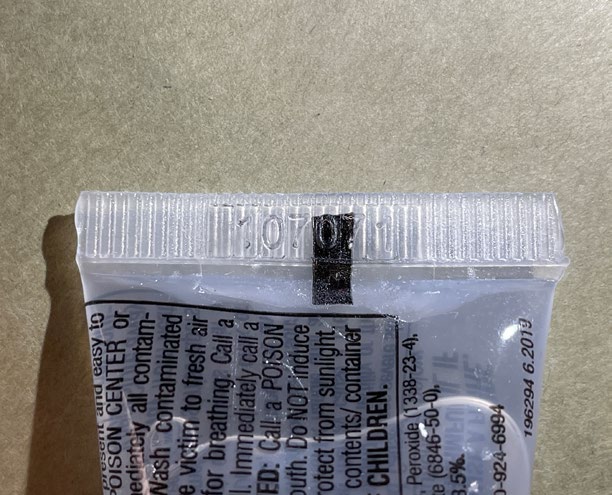

107071
1 07 071
↑ ↑ ↑
Year Month Batch Batch Information
(2021) (July)
01=January 02=February 03=March 04=April 05=May 06=June
07=July 08=August 09=September 10=October 11=November 12=December
NOTE: Avoiding using if Batch Date is beyond 12 months of age.
| DOWNLOAD PDF VERSION |
Body Filler Staining
With the exception of the highest quality Body Fillers, almost all Body Fillers can stain. To help you and your customers understand how to prevent staining and ensure a quality repair, we will discuss both the cause of staining and the best way to prevent staining from occurring.
What causes Staining?
Staining can be caused by either under-catalization or over-catalization. Under-catalization will result in an incomplete cure and unreacted chemicals that migrate up through the vehicle’s finish. Some of these chemicals can migrate up through the primer and base coat to cause discoloration in the clear coat. Most under-catalization stains are visible as yellow, orange or pink in the affected area on white or lighter colored vehicles. Cheap Clear Coats without UV protection can also encourage staining over fillers.
Ways to prevent staining:
The best way to prevent staining is to use a stain-resistant formula like the Evercoat Rage family of Products (Rage Ultra, Rage Gold, Rage Extreme and Rage). The Rage family of products is made of Premium Resins specifically designed to prevent staining.
Always Use a Two-part polyester finishing and blending putty over the Body Filler. The 2 part finishing putty will help prevent staining when used under basecoat/clearcoat paint systems. In addition, Evercoat finishing putties such as Metal Glaze Ultra, Metal Glaze and Easy Sand spread smoothly, are easy to sand and easily fill grind marks, pinholes and uneven surfaces.
What if I have a stain?
If staining is present, sand the surface and apply polyester or epoxy primer to block the further migration of the unreacted chemicals. Allow to dry and sand according to Manufacturers recommendations. This can correct the stain without removing the filler.
| DOWNLOAD PDF VERSION |
Body Filler Application to OEM Paint
The following Evercoat Fillers, Putties, and Polyester Primers have been approved for use on properly prepared OEM coatings:
FILLERS
• Rage® Ultra
• Rage® Optex®
• Commercial Ultra
• Commercial Optex®™
• Rage® Ultra XTRA™
• Quantum1™ Large Repair
• Light Speed™ Optex®
PUTTIES
• Metal Glaze®
• Glaze Coat
• Metal Glaze® Ultra
• Metal Glaze® OEM™
• Metal Glaze® Optex®
• EverGold™ Putty
• Easy Sand™
• Z-GRIP GLAZE®
• Poly-Flex™
• Spot Lite™
• Polyester Glazing Putty
• Euro-Soft®
POLYESTER PRIMERS
• Super Build 4:1
• Optex® Super Build 4:1
• Finish Sand 4:1
• Fiber Fill 4:1
• FEATHER FILL® G2™
• SLICK SAND™
• *Light Speed™ LED Cure HB Primer
*Must be cured with the appropriate UV LED Lamp. See Tech Data Sheet for more specific information.
Begin the repair process by cleaning the panel with soap and water followed by a solvent cleaner. Once the panel is properly cleaned prepare the repair area with 80 to 180 grit, and featheredge the surrounding area out into the clear coat, then apply the appropriate product. After the product has cured, sand to contour with 180 grit or finer. Apply the selected polyester primer according to the Technical Data Sheet.
NOTE:
For more information on the application of Evercoat products please see the Evercoat FILLERS & PUTTIES Best Practices Brochure
| DOWNLOAD PDF VERSION |
Body Filler Thinning / Viscosity Adjustment
The recommendation to adjust the viscosity of Evercoat Fillers is to use a premium glazing/finishing putty such as Metal Glaze® Ultra, Metal Glaze®, Metal Glaze® OEM™, Glaze Coat, Easy Sand™, or EverGold™ Putty. These finishing putties can be added to any Evercoat Filler up to any desired proportion to create the viscosity of the customers choosing. Information on how to use our intermixable system can be seen on the back of the Evercoat Fillers Brochure #704014.
The instructions below will demonstrate how to reduce a filler by 10% at 72°F (22°C). When using any of the above mentioned premium glazing/finishing putty product ratios can be adjusted up or down as needed.
1. Dispense a 4” (10 cm) puddle of Evercoat Filler.
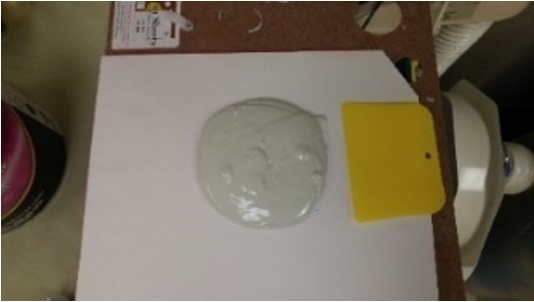
2. Make a small divot in the middle of the filler puddle and dispense up to a 1.5” (4 cm) puddle of the desired product.
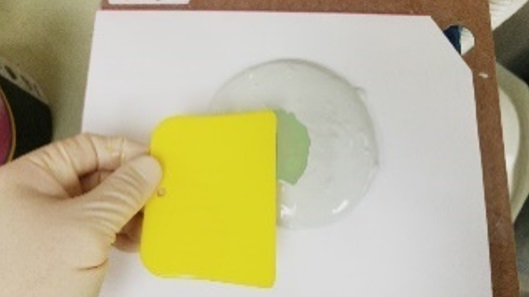
3. Dispense a bead of Evercoat® BPO Cream Hardener from edge to edge on the puddle of filler to catalyze to a total of 2%.
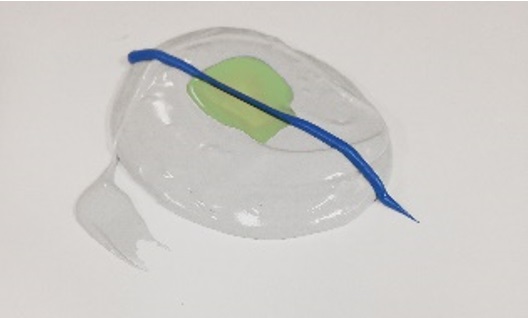
Caution: The use of Fiberglass Resin (#498/#499/#500), Laminating Resin (#560/#561), SMC Fiberglass Resin (#864/#865), Premium Marine Resin (#552/#553/#554), or Boatyard Resin (#517/#518/#519) is NOT recommended to be used to thin or adjust the viscosity of Evercoat Fillers.
Evercoat Plastik Honey #1249: If additional viscosity requirements are necessary, the only resin that is recommended is Evercoat Plastik Honey #1249. When using Plastik Honey it is not recommended to exceed 10% so as to not compromise the sanding properties of the product.(See mixing information above)
For volumes larger than a 4” (10 cm) puddle weigh out the required amount of Evercoat Filler and add up to 10% of #1249 Plastik Honey, then catalyze the total volume to 2% by weight with Evercoat BPO Cream Hardener.
WARNING: Plastik Honey can NOT be used with Quantum1 10:1 Single Step Repair
Technology products, or Evercoat Ultra products that use EcoResin™.
| DOWNLOAD PDF VERSION |
440 Express
The following revisions were made to the Product Information Sheet regarding the use with waterborne primers.
NOTE: When using waterborne primers, allow 440 Express to dry for 15-20 minutes. Finish by sanding with 320 or finer sandpaper, then follow your waterborne coating manufacturers’ recommendations.
NOTE: If excess 440Express builds up on the repair area, allow to dry 15-20 minutes, then lightly sand with 320 grit or finer sandpaper to remove any excess product prior to applying primer. For additional information on application techniques go to ITW Evercoat on YouTube.
Please advise your customers using waterborne primers to follow the above recommendations.
| DOWNLOAD PDF VERSION |
Infrared (IR) and Body Filler
Infra-Red Heat (IR) can be used to accelerate the cure time of Body Filler over galvanized steel. Typically IR is used during winter months when cold temperatures prolong cure time. It is important not to overheat the Body Filler or you may experience blistering.
- To successfully use IR to accelerate Cure Time, we have developed the following step by step procedure.
- Mix Body Filler and Catalyst at 50 to 1 mix ratio by weight (see below for examples of the proper amount of filler to use based on the size puddle of Body Filler you need for your job)
- Thoroughly mix the Body Filler and Catalyst until you get a uniform color
- Apply the Body Filler to the panel, start by wetting out the surface with a thin coat and then build up to the shape of the repair
- Evercoat Body Fillers are designed to be used at body shop temperatures of 60˚ – 100˚F (15˚ – 38 ˚C)
- If an IR lamp must be used, take care to keep the surface temperature of the filler under 125˚F (52˚C)
- Temperatures greater than 125˚F (52˚C) will interfere with the curing process over galvanized steel.
- Generally, a lamp distance of 3 feet (91 cm) is adequate for proper cure.
- Apply IR for 10 minutes, then allow the panel to cool for another 10 minutes
- The panel will then be ready to Sand
Following these steps will accelerate the Cure Time of the repair, eliminate the risk of blistering, and ensure a quality repair.
| DOWNLOAD PDF VERSION |
MAXIM Cartridges
Full Cartridge
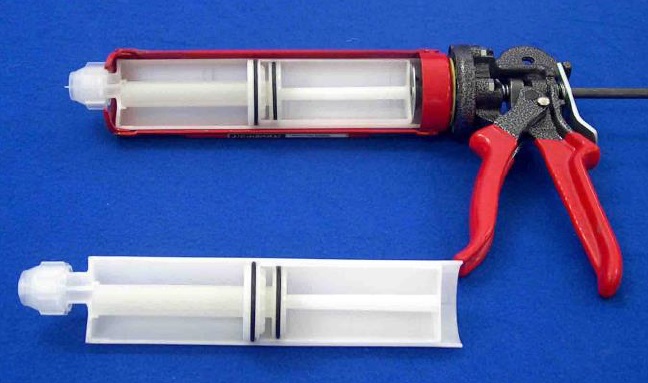
This picture illustrates a full universal cartridge. The plunger/rod of the caulking gun is fully extended.
One product component is located in the top of the cartridge and the other in the bottom.
Empty Cartridge
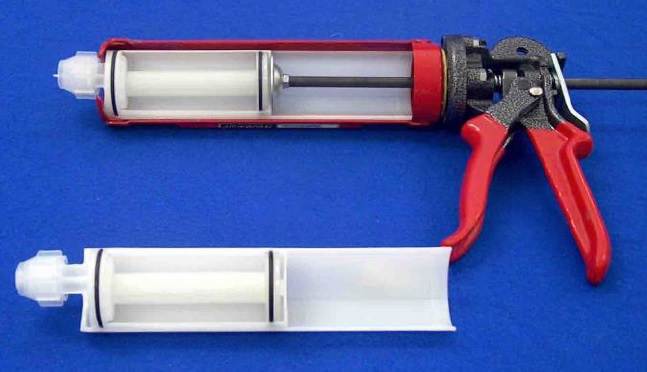
In this position all of the product has been emptied from the cartridge.
This picture illustrates an empty universal cartridge. The plunger/rod of the caulking gun is now half way into the barrel of the caulking gun (approximately 3-4”). Half of the plunger rod will still be extended from the gun. Do not force the trigger to apply more product. Damage to the gun or cartridge may occur.
| DOWNLOAD PDF VERSION |
MAXIM Equalizing Cartridges
- Inspect caulking gun for plunger alignment
- Check cartridge for leakage and batch date
- Cut or break away seal of cartridge and inspect for cured or dried product in the end of the cartridge
- Install cartridge into caulking gun
- Gun out small amount of product without the static mix tip to equalize the cartridge
- Attach the static mix tip and gun out a bead the length of the mixing tip to insure proper color mix. This bead can be used to check cure time
- Proceed with the repair process
- Relieve the pressure from the gun
- Remove cartridge from the caulking gun
- Leave mixing tip on the cartridge or replace with the cap
- If the mixing tip is left on the cartridge, store the cartridge inverted (upside down) to reduce contamination or gelling at the front end of the cartridge.
- Product should be stored in a dry area with moderate humidity at a temperature between 70oF – 80o F (21oC – 27oC). If the
- product is stored in a colder temperature, it should be brought to room temperature before using.
| DOWNLOAD PDF VERSION |
MAXIM Manual, Pneumatic, and Cordless Caulking Guns
Manual vs. Pneumatic vs Cordless Electric
The option of using a manual or a powered caulking gun is available with Maxim™ products.
Factors to consider
- Frequency of use
- Product Technology
- Number of cartridges per job
- Viscosity of product
- Surface area
- Type of bead desired
MANUAL CAULKING GUNS
Manual caulking guns are graded by mechanical advantage (MA). This is the relationship between the travel of the pistol grip and the plunger. For example, a caulking gun with a MA of 4 means if you depress the grip 2”, the plunger will advance into the cartridge 0.5”.
Generally, cheaper models with thin sheet metal carriages have a MA of 3-8. These caulking guns are not recommended for MAXIM™ products. The recommended manual caulking gun for these products should have an MA of 18-26. MAXIM™ Bonding Adhesives and Seam Sealers (two-component) work best at 26 MA.
PNEUMATIC CAULKING GUNS
The force is adjusted by regulating the pressure of the incoming air. Almost all pneumatic caulking guns have a 2” air cylinder. This limits the maximum force that they can develop. The performance of a cordless electric and a pneumatic caulking gun is similar when extruding a 1/8” to 3/8” bead. When extruding a larger bead and maximum output is required, the cordless electric gun is superior. One advantage of the pneumatic caulking gun is the weight. A pneumatic gun is usually one-half the weight of a cordless electric.
Note: If a pneumatic caulking gun is used with MAXIM™ products, it must be a single-action, rod-driven pneumatic gun. One that works well is #61004LP made by Cox Quality Sealant Applicators.(www.cox-applicators.com).
Do not use a standard pneumatic caulking gun i.e. (Astro Tools #405)
CORDLESS ELECTRIC CAULKING GUNS
The cordless caulking gun is an ideal approach for MAXIM™ products. Milwaukee® and Ryobi® both offer a cordless electric caulking gun.
Milwaukee® is powered by a 14.4-volt battery and delivers a pushing force of 620 lbs. dispenses the highest viscosity materials with ease. The auto reverse feature prevents unwanted dripping of materials.
Ryobi® is powered by a long-life 18-volt battery and has over 500 lbs. of push force to handle higher viscosity materials. When the trigger is released, the plunger moves back and decompresses the cartridge, ensuring a nice clean fluid shutoff.
| DOWNLOAD PDF VERSION |
MAXIM Structural and Non-Structural Repairs
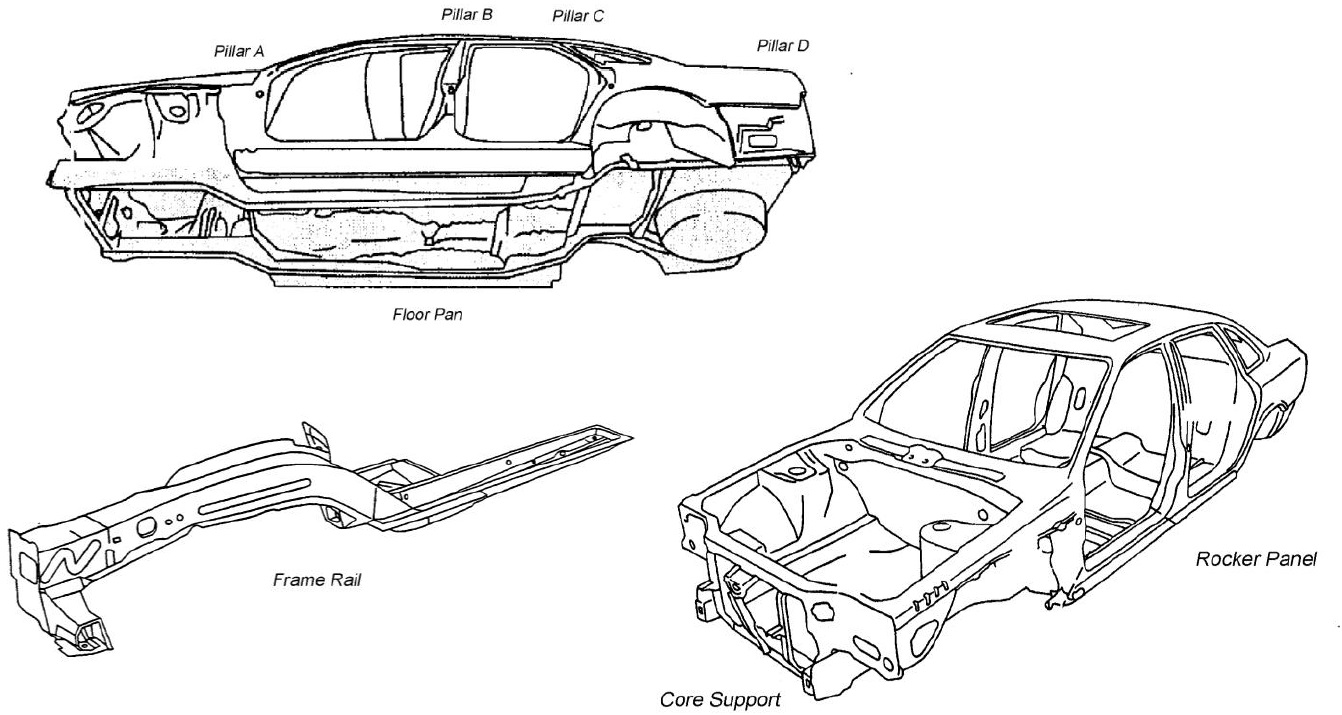
The images below show structural repair areas, as stated by I-CAR and Insurance standards.
MAXIM™ repair products are not intended for structural repair.
Evercoat repair procedures (single-sided, two-sided, tab repair and panel replacements) are considered non-structural repairs. These type of repairs do not influence or effect the structural integrity of the vehicle.
All current and future MAXIM™ products are for non-structural repairs.
SEM, Fuzor, 3M, Wurth, Transtar, International Epoxy and Sealants are all considered the same.
| DOWNLOAD PDF VERSION |
MIG Brazing (Silicon Bronze)
The following fillers are approved for use over MIG Brazed (Silicon Bronze Welded) areas. These products will need to reach their maximum sanding time to ensure proper adhesion before beginning to sand.
Rage® Optex™
Rage® Ultra
Rage® Ultra Extra
Metal Glaze® Optex™
Metal Glaze® Ultra
EDGE Premium
EDGE Sync
FIBER TECH®
Please note, that to apply a traditional polyester filler to these areas, an epoxy primer must first be applied as a barrier coat; then the polyester filler can be applied after the appropriate cure time and preparation procedures as recommended by the paint manufacturer.
Please advise your customers when repairing around these factory seams, or when using a MIG Brazing process for aftermarket procedures, to apply an epoxy primer and to follow their coating manufacturer’s recommendations for applying a polyester filler when using products other than the above listed products.
For more information regarding the application of a polyester filler over an epoxy primer please refer to the Evercoat TECH TIP 100-EPOXY PRIMER-TT for Application of Polyester Fillers, Putties, and Primers over Epoxy Primers.
| DOWNLOAD PDF VERSION |
Plastic Repair as Seam Sealer
Evercoat has now approved the use of the epoxy plastic repair products to be used as a seam sealer. This includes the following products; MAXIM #100898, Evercoat #106105, and EDGE #200590
To use the above listed products, apply a 2K urethane or epoxy primer surfacer according to the coating manufacturers’ recommendations. Allow the proper cure time as per the coating recommendations, scuff sand the area with P320 to P400 Grit (or a red scuff pad), and then remove the sanding dust with clean compressed air. Re-clean the area with an all-purpose solvent cleaner prior to applying seam sealer to the area.
After reaching the recommended sanding time for the repair products, lightly scuff the seam sealant with P400 or finer (a gray scuff pad may also be used) and top coat. If sanding is required to match an OEM appearance, remove sanding dust with clean compressed air, and apply a primer surfacer according to the coating manufacturers recommendations.
| DOWNLOAD PDF VERSION |
Poly-Flex Flame Treatment
The following information is to provide further explanation on the use of Poly-Flex. There are numerous types of plastics. Though, most plastics can be grouped into two families: thermoplastics and thermoset plastics. It is necessary to identify the type of plastic being repaired so the proper repair can be performed.
Thermoplastics are formed with heat, and then cooled to shape. These plastics can be reshaped again by reheating and cooling. This can be done because there is no chemical reaction between the heating and cooling process. Thermoplastics can be cosmetically repaired with Poly-Flex using general repair procedures (i.e. sanding, cleaning and application of Poly-Flex). Within the thermoplastics there is a sub-group called olefin plastics. An example of olefin plastics are (TPO) Thermoplastic Olefin, (PE) Polyethylene and (PP) Polypropylene. Olefin plastics are the most difficult to adhere to. Therefore, it is recommended that an extra step is followed when repairing olefin plastics. The additional step of an adhesion promoter and/or a heat treatment is required. This additional step is required because olefin plastics contain a Mold Release Agent from the manufacturing process. It is recommended that a flame treatment be used to promote adhesion of Poly-Flex.
The second family of plastic is known as thermoset plastics. Thermoset plastics are manufactured with a chemical reaction, and therefore cannot be reformed or softened with heat.
Thermoset plastics fall into two categories: flexible or rigid. Examples of rigid thermoset plastics are (SMC) Sheet Molded Compounds and Fiberglass. Some examples of flexible thermoset plastics are urethanes such as (PUR) Polyurethane, (RIM) Reaction Injected Molded. These types of plastics may also require general preparation (i.e. cleaning, tapering, or sanding) prior to using Poly-Flex.
Conducting a ‘sanding test’ can identify Thermoset plastics and thermoplastics. Thermoplastics will smear or drag when power sanded. Thermoset plastics will sand to a fine powder and produce dust whether they are rigid or flexible.
FLAME TREATMENT
The process outlined below will oxidize the surface to enhance the adhesion of Poly-Flex on olefin plastics.
1. Clean and scuff the repair area and sand with 180 to 220 grit at a low RPM
2. Remove the sanding dust with an air blowgun
3. With a propane or butane torch sweep the area allowing the tip of the flame to lightly pass over the repair NOTE: Do not let the flame heat the surface of the repair; heating the plastic can pull the mold release agents to the surface and cause poor adhesion for the repair material
4. Apply Poly-Flex and continue with the repair.
| DOWNLOAD PDF VERSION |
Polyester Application Over Epoxy Primer
The application of an epoxy pre-coat is not required when using the Evercoat 4:1 Polyester Primers (Finish Sand, Super Build, Fiber Fill). These DTM products meet the ASTM B117 corrosion standards and provide 500 hours of salt spray corrosion testing, thus eliminating the need for an extra coating requirement.
NOTE: When using fiber reinforced fillers, it is advised to apply those materials directly to the substrate and avoid the use of an epoxy coating.
When applying a polyester body filler, glazing putty, or polyester primer over an automotive aftermarket epoxy primer begin by verifying with the epoxy coating manufacturer that it is compatible to be top coated with the above-mentioned polyester products.
If the epoxy coating manufacturer does NOT recommend the application of a polyester product over their epoxy coating material, follow their recommendations and avoid the application of a polyester product.
The application window and recommendation for a polyester based product over the epoxy system may vary depending on the paint company / epoxy coating manufacturer. Therefore, it is advised to ensure the use of the proper catalyst speed, to check the epoxy catalyst batch date to ensure freshness for proper performance, and ensure compatibility with a polyester top coat before the application of the epoxy system.
The following procedure for the application of Evercoat polyester products is a general guideline, and is therefore not intended to supersede, or be in lieu of the epoxy coating manufacturer’s recommendations if not approved to do so.
- Apply 1 – 2 light coat(s) with the recommended spray gun tip size to a achieve a Dry Film Thickness minimum of .75 mils (19 microns), but not exceeding 1.5 mils (38 microns)
- Allow at least 24 hours with a minimum temperature of 70°F (21°C)
- Lightly sand with 180 – 220 Grit allowing a minimum remaining film of .5 mils (12 microns), but not exceeding .7 mils (18 microns)
NOTE: If epoxy primer was applied beyond 24 hours, or the Dry Film Thickness exceeds .7 mils, continue sanding until within the range of .5 – .7 mils (12 – 18 microns) - Remove sanding dust with clean compressed air or a fast evaporating solvent (contact the epoxy coating manufacturer for recommendations if needed)
- Apply the selected Evercoat polyester product as per the Technical Data Sheet.
| DOWNLOAD PDF VERSION |
Solvents Over Polyester Fillers/Putties
The use of slower flashing solvents directly over sanded or un-sanded Evercoat filler and/or putty are NOT recommended or condoned. The application of these slow-evaporating solvents over a sanded polyester filler or putty to check for quality of repair or surface straightness / alignment can cause potential absorption. Such materials may include, but are not limited to, Wax and Grease Removers, Urethane Reducers, or Gloss Simulators such as Like90 Quick Check™.
If a solvent is required to aid with surface cleaning or dust removal, only fast-evaporating solvents such acetone or alcohol are recommended.
| DOWNLOAD PDF VERSION |
Vette Panel Adhesive
Evercoat Vette Panel Adhesive / Filler can now be used as a replacement for #994 SMC Panel Adhesive.
Evercoat Vette Panel Adhesive / Filler is a quick-setting, polyester adhesive designed for light bonding of fiberglass and now SMC. It sets up quickly and provides for easier finishing than many epoxy repair products with less repair mapping associated with using dissimilar chemistries. Vette Panel Adhesive / Filler can be used with fiberglass cloth or mat for general repairs and for fixing small holes.
Vette Panel provides a working time of 8-10 minutes. Parts should remain clamped for up to 12 hours. Full bonding strength is achieved within 24 hours.
Refer to the product label or Technical Data Sheet for application procedures.
NOTE: When repairing or replacing large SMC panels which require longer working time and stronger adhesion, use Evercoat Panel Bonding Adhesive.
| DOWNLOAD PDF VERSION |
Putty Pusher Valve
There is a potential problem that could occur with the disposable valve cracking on the #100171 Putty Pusher dispenser pail when the valve is improperly installed.
To correctly mount the valve, it is important to first turn the pail upside down then unscrew the cap and remove the seal.
Next, screw the valve on by hand before the valve gate is installed then gently work the valve gate into the slot.
NOTE: Some valves may be tighter than others and forcing the valve gate through could cause the valve to crack or stretch out of shape which may cause leaking.
Once the valve gate is installed, if it needs adjusting to face it in the right direction do not use the valve gate as leverage to turn the valve as this could cause it to crack.
When the valve is completely installed turn the pail over and mount it into the dispenser.
| DOWNLOAD PDF VERSION |
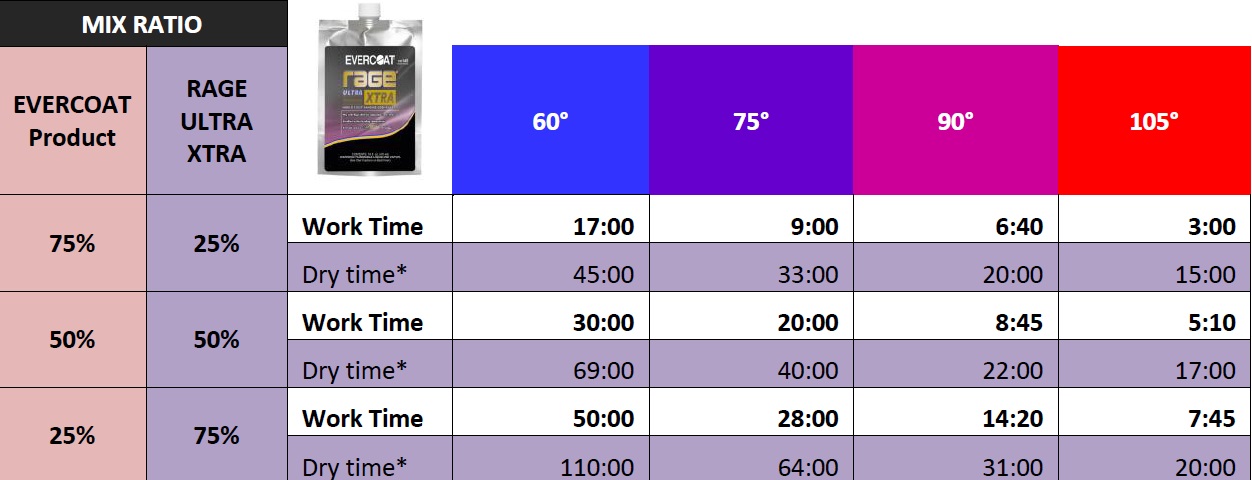
High Heat and Large Panel Application
If additional work is required due to high temperatures, or for larger repairs, it is
recommended to use EVERCOAT Rage® Ultra XTRA™ part #100147 as an additive for
all EVERCOAT Fillers. It may also be used with EVERCOAT Glazing / Finishing Putties
to extend working time and to improve vertical hold.
To successfully mix #100147 with an EVERCOAT Filler or Putty, begin by adding
approximately 10% to the product being used. Mix the two products together
completely, then mix with EVERCOAT BPO Cream Hardener at a 50 to 1 (2%) ratio by
weight and mix until a uniform color is achieved.
If additional working time is required see the chart below for mixing recommendations.
NOTE: EVERCOAT Rage® Ultra XTRA™ part number 100144 / 147 is not
recommended to use with EVERCOAT Reinforced or Specialty Fillers; EVERGLASS®,
FIBER TECH®, GLASS-LITE™, KITTY HAIR® / TIGER HAIR®, or VETTE PANEL
ADHESIVE / FILLER™. Mixing with these products will create a hybrid product that is
neither a fiber reinforced / specialty filler nor a regular filler.
If a fiber reinforced filler is to be used, it is recommended to use these products
unblended to maintain their maximum strength and performance.
CAUTION: EVERCOAT Rage® Ultra XTRA™ part number 100147 is not compatible with EVERCOAT
METAL-2-METAL part #100889 and therefore not to be blended.
These products contain non-compatible resins and require different catalyst chemistries
| DOWNLOAD PDF VERSION |
Hail Damage Repair Procedure to OEM Paint

SUBJECT: EVERCOAT Hail Damage Repair for OEM Paint
The following Evercoat products have been approved for use on properly prepared OEM finishes for hail damage repairs:
Rage® Ultra
Rage® OPTEX™
Rage® Ultra Xtra
Metal Glaze® Ultra
Metal Glaze® OPTEX™
Metal Glaze®
Finish Sand 4:1 Primer Surfacer
Super Build 4:1 Primer Surfacer
OPTEX™ Super Build 4:1 Primer Surfacer
Begin the repair process by cleaning the panel with soap and water followed by a solvent cleaner. Once the panel is properly cleaned prepare the panel(s) with 320 grit by sanding with a 6” DA Sander at medium speed. The hail dents will remain shiny and be easy to identify.
*Panel may be sanded with 180 – 220 grit instead of 320 grit if preferred

Prepare the hail damage dents with 180 – 220 grit for application of premium filler or putty.

Apply selected product with even firm pressure to sanded hail damaged areas. Allow to reach specified sanding time and sand entire panel with 180-220 grit.
Mix the selected 4:1 Polyester primer to the proper mix and apply 2-3 medium wet coats. Allow the proper time for sanding and block.
NOTE:
For more information on the application of Evercoat products please see the Evercoat FILLERS & PUTTIES Best Practices Brochure and Evercoat POLYESTER PRIMERS Brochure.
| CLICK TO DOWNLOAD |
High Build Roll-On Polyester Primer Procedure
The following Evercoat High Build Polyester Primers have been approved for roll on application over FRP, SMC, Aluminum, Steel, sanded Evercoat fillers/putties and properly prepared and sanded OEM Paint.
Super Build 4:1 Primer Surfacer
OPTEX™ Super Build 4:1 Primer Surfacer
MIXING
• Mix primer thoroughly on a paint shaker, mixing bank, or with a paint stick.
• Pour required amount into a paint mixing cup and mix at a 4:1 ratio with Evercoat #733 Catalyst
• Mix thoroughly with a paint stick
NOTE: Avoid mixing at improper ratio or adding too much catalyst.
APPLICATION
• Apply 4:1 mix with a short nap or foam roller cover
• Allow 4-8 minutes flash time depending on temperature for a second coat if required
SANDING
• Allow proper sanding time as per the Product Tech Sheet before sanding.
• Sand with 150 – 180 grit, followed by 320 grit
NOTE: Sanding time can vary due to substrate and ambient temperatures.
INSPECTION
• Remove sanding dust with clean compressed air and inspect thoroughly
• Repeat application with one additional coat if needed
For more information on the application of Evercoat products please see the Evercoat FILLERS & PUTTIES Best Practices Brochure and Evercoat POLYESTER PRIMERS Brochure.
| DOWNLOAD PDF VERSION |